How to Clean Horse Tack: A Complete Guide
Horse tack is essential for any equestrian activity. It’s not just about the ride, but also the care and maintenance of your equipment.
Cleaning your horse tack is a crucial part of this process. Regular cleaning not only ensures the longevity of your tack but also its safety.
But the question is, how to clean horse tack properly? What are the best practices for leather tack care?
This guide will provide you with a comprehensive answer. It will walk you through the steps of cleaning horse tack, from removing dirt and grime to conditioning and preservation.
Whether you’re a horse owner, a stable manager, or an equestrian enthusiast, this tack preservation guide is for you.
So, let’s dive in and learn how to clean horse tack effectively and efficiently!
Understanding Your Horse Tack
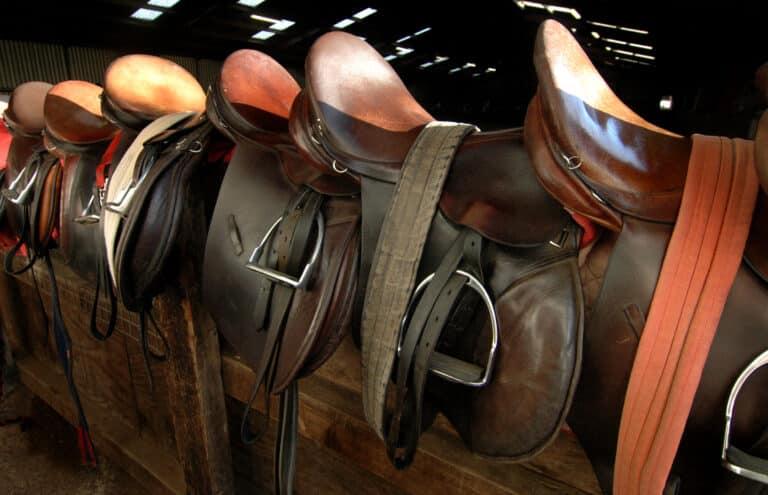
Knowing your horse tack is the first step in proper care. Tack often includes saddles, girths or cinches, bridles, and reins. Manufacturers primarily make these from leather, which offers strength and durability. However, leather requires special attention to remain in good condition.
Sweat, dirt, and grime build up over time, affecting leather’s longevity. Neglecting tack can also lead to the development of mold and mildew.
Different leathers may require different care techniques. Recognizing these variations is crucial to maintaining your tack effectively. Understanding what your tack needs simplifies the cleaning process and can ready you on how to clean horse tack.
How To Clean Horse Tack: Preparation
Before you begin cleaning your tack, gather all necessary tools and products. Having everything at hand simplifies the task.
Choose a well-ventilated area with good lighting. This ensures you can see and clean every corner of your tack.
Prepare your workspace with a clean, flat surface to lay out your items. This helps avoid potential mess.
Here’s a checklist of essentials you’ll need:
- Saddle soap or leather cleaner
- Soft cloths or sponges
- Buckets of warm water
- Leather conditioner or cream
- Small brushes for detailed cleaning
Having this checklist on hand ensures a smooth cleaning process and confidence on how to clean horse tack.

Step-by-Step Guide: How to Clean Horse Tack Leather
Cleaning your leather tack begins with understanding its components. Detach any removable parts for more thorough cleaning.
Inspect each piece for visible dirt and grime. You should focus on areas that come in contact with the horse, as they accumulate more grime.
Start the cleaning by dusting off loose dirt. Use a soft cloth for the best results.
Next, slightly dampen a cloth or sponge with warm water. Avoid soaking it; the leather shouldn’t get too wet.
Gently wipe down the tack to remove surface impurities. Pay attention to seams and stitched areas.
For stubborn patches, use a small brush. This helps to clean intricate details without damaging the leather.
Once you remove all dirt, the surface will be ready for cleaning products.
Follow with a recommended leather cleaner. Be sure it suits the type of leather you have.
Apply the cleaner to a cloth, never directly onto the leather. Work in small sections for even application.
Taking it one step at a time ensures the leather remains intact and well-preserved.

Removing Dirt and Grime
The first step in cleaning tack is addressing dirt buildup. Daily use and outdoor exposure result in grime, especially on high-contact parts.
Start by using a dry cloth to remove surface dirt. Dusting prevents grime from setting in further.
For caked-on dirt, introduce a soft brush. This will reach into tough spots like creases or stitching.
Gently brushing loosens and eliminates debris without scraping or harming the leather. This preparation is crucial for effective cleaning.

Applying Leather Cleaner
With dirt removed, move to applying a leather cleaner.
Select a product appropriate for the type of leather.
Dampen a soft cloth with cleaner. Avoid over-saturation to prevent leather damage.
Work the cloth over the tack in a circular motion. This technique ensures even distribution.
Ensure all areas receive attention. Spot cleaning patches might lead to discoloration or uneven wear over time.
Rinsing and Drying
Once cleaning is complete, begin rinsing. Use a cloth dipped in clean water to wipe away cleaner residues.
A second damp cloth may be necessary to ensure no soapy traces remain. Leftover soap could dry out the leather.
Allow the tack to air-dry naturally. Lay it flat away from heat sources or direct sunlight.
Quick drying minimizes the risk of warping or cracking. Natural drying maintains the leather’s integrity.
Conditioning Your Tack
Conditioning is a vital step in leather care. It restores flexibility and prevents cracking.
Before you start, ensure the tack is completely dry. Applying conditioner on wet leather might cause damage.
Select a high-quality leather conditioner. Choose one specifically designed for your tack.
Use a soft, clean cloth to apply the conditioner. A small, even amount is typically sufficient.
Spread the product gently, covering every inch. Too much can oversaturate and weaken the leather.

When and How to Condition
Conditioning frequency depends on usage. Regular use means conditioning once a month.
Infrequent use may require less frequent conditioning. Always observe your tack’s condition.
When applying, use sparing amounts. Excess could lead to a slick or sticky surface.
Work the conditioner into the leather thoroughly. This step boosts longevity and tack performance. Buff out any excess once you have finished with a soft cloth or small piece of sheepskin fleece.
How to Clean Horse Tack: Preservation Tips
Preserving tack involves more than just cleaning and conditioning. It requires consistent maintenance.
Regular check-ups ensure your tack is safe and functional. Look for any signs of wear or damage.
Proper storage also plays a crucial role. Avoid damp or overly hot environments.
To help preserve your tack, consider these tips:
- Regularly check for signs of wear and tear.
- Store tack in a cool, dry place.
- Use covers to protect from dust and sunlight.
Preservation maximizes the life of your tack. It’s essential for both safety and performance.
Regular Maintenance
Regular maintenance prevents unexpected failures. Set a routine for examining your tack.
Check for stitching issues or worn areas. Address problems immediately to avoid future breakdowns.
Developing a habit of routine maintenance keeps tack in top condition and is a time-saving and money-saving investment.
Proper Storage
Proper storage extends the life of your tack. Keep it in a well-ventilated area.
Avoid direct sunlight which can dry out the leather. You should avoid damp environments too.
Using covers can guard against dust and moisture. Protecting tack now prevents issues later.
How To Clean Horse Tack: Common Mistakes
Many tack care errors stem from incorrect product use. When considering how to clean horse tack, void using household cleaners on leather.
Neglecting regular checks can lead to hidden damage. Don’t wait for visible issues to appear.
Rushing through cleaning tasks often results in incomplete care. Take your time for thorough maintenance.
Here’s a list of common mistakes:
- Using harsh chemicals not meant for leather.
- Skipping regular inspections for wear.
- Storing tack in unsuitable environments.
Avoiding these mistakes enhances tack longevity and performance. It safeguards both your investment and your horse’s comfort.
How to Clean Horse Tack: Additional Care for Metal Parts and Accessories
Metal parts on your tack need attention too. Rust can compromise functionality and appearance. Regular polishing is key. Use a soft cloth to buff metal components. This maintains shine and prevents tarnish. Avoid abrasive materials that may scratch.
Check for loose or damaged parts. Prompt repairs protect both tack and horse. Regular maintenance ensures safe performance.
Routine Tack Care Schedule
Regular tack cleaning is crucial for long-lasting gear. It enhances safety and comfort for your horse. Maintaining a proper routine is key.
Frequent inspections help identify potential problems early. This prevents small issues from turning into costly repairs. Consistency is vital for effective tack care.
Creating a routine makes it easier to stay on top of maintenance. It ensures that no detail is overlooked. Here’s a simple schedule to follow:
Daily: Quick wipe-down and inspection.
Weekly: Deep cleaning and conditioning.
Monthly: Thorough check for damage and repair.
Adhering to this schedule ensures your tack remains in top condition. It also improves its resale value should you decide to sell. A well-maintained tack is crucial for a successful equestrian experience!